.png?width=300&height=157&name=spt%20logo%20png%20(1).png)
To design a protocol from scratch, you will need to:
- Define the plates and well arrays to be used
- Define the assets needed for the protocol
- Define the sequence of protocol steps
- Set asset or step properties where necessary
- Position the assets on the deck
The important points to remember are:
- firefly can only dispense into one plate or carry out one pipetting task at a time, so you cannot design a protocol with concurrent pipetting and dispensing steps.
- firefly and firefly+ grippers can continue to move items during a shake, heat/cool or incubate step, if you have selected 'Start and continue' behavior. The grippers cannot operate during dispensing, pipetting, loading or unloading steps as the heads will require access to the decks.
- firefly protocols must be linear, the protocol design doesn’t allow for conditional actions. Once a protocol is started, firefly will run it to the end unless the user intervenes and cancels it. If you want to automate a process which has different steps depending on an assay result, you will have to stop at the decision point.
- There are limitations on where labware can be placed to allow the dispensing and pipetting heads to access plates. Using the Deck wizard will ensure that you place your labware correctly.
You may find it helpful to design the main workflow of your protocol in a charting tool or sketch it by hand, before starting to build it up in firefly software.
firefly software is very versatile and allows you to use any design approach you wish when you start to build your protocol on the Design screen. You can start by defining the protocol steps, then add the required assets or start with the assets and then the steps to process them. There are no constraints on the order in which you build up a protocol.
Use Notes to organize long protocols into sections, you can also use Group to hide the details of completed process sequences and clarify the Steps view.
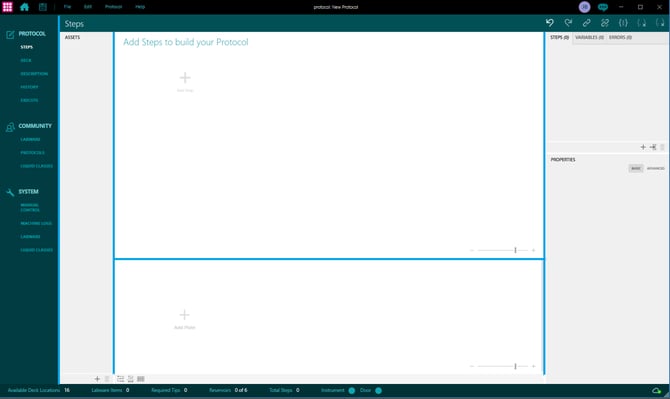
You can choose to view Plates, Steps or both when designing. Click the icon for the option which you find most useful.

You can also resize all the Design areas to show whatever is most convenient for your task by dragging the frame edges e.g., to maximise the Steps area as shown below. Blue lines mark the draggable frame edges.
The Editing a protocol section of this manual describes how to add and use plates, assets, and protocol steps in detail. When building them into a new protocol, there are various standard sequences for using them.
9.5.1 Pipetting
You will need to include these elements to carry out any pipetting task.
- Loading tip sets or tip boxes and plates, using ‘Setup & loading’
- A ‘load tips’ step to load the pipette head with tips.
- A pipetting task (copy, mix or aspirate then dispense).
- A ‘load tips’ step to remove the used tips, using the ‘unload only’ option. You can use the same tips repeatedly, or change them at whatever points in the protocol are appropriate. At the end of the protocol you must remove the last set of tips before you run another protocol or shutdown firefly. If there is liquid remaining in the tips, the software will prompt you to purge the tips before unloading.
- A User interaction for unloading the plates and the used tips, unless they are to be
unloaded after the protocol completes.
The pipette head requires enough space to access well arrays e.g., it cannot dispense into a deck location which has a tip stand to the left of it. Use the Auto fill deck (see section 9.5.6) to ensure that you place your labware appropriately.
9.5.2 Dispensing
You will need to include these elements to carry out any dispensing task.
- Loading reservoirs, syringes and a destination plate using ‘Setup & loading’.
- Either a fill step or separate aspirate and dispense steps. If there is liquid remaining in the syringes, the software will prompt you to purge the syringes before unloading.
If you will only be dispensing one or two reagents, and have plenty of material, you could use more than one reservoir for each and link the dispenses, and firefly will then dispense from multiple syringes in parallel and complete the step faster. This could be useful for larger volume dispense steps. The downside would be a larger reagent dead volume is needed, but this is recoverable at the end of the protocol.
9.5.3 Heating or chilling
9.5.3.i Plates
You will usually need to include these elements to use the plate thermal module.
- A ‘Start and wait’ or ‘Start and continue’ step to start the plate thermal module heating or chilling, and set the required temperature. Using ‘Start and continue’ enables this to happen while other protocol steps are progressing.
- A ‘Place on’ step to put the thermal block on the plate thermal module, unless you had loaded it there at the start of the protocol.
- A ‘Place on’ step to put the plate on the thermal block, unless you had loaded the plate in that position at the start of the protocol.
- One or more steps which will be carried out while the plate is being heated or cooled. This could be a pipetting step (which can be carried out while one of the plates is on the plate thermal module) or any other action not involving the plate.
- A 'Move' or 'Take off' step to remove the plate from the plate thermal module.
- A 'Stop' step, to turn off heating or chilling, once it is not needed.
Only the plate on the plate thermal module has active temperature control. You could have multiple thermal blocks to keep multiple plates chilled or heated, moving them around together and taking turns returning them to the plate thermal module for further heating or cooling. The thermal block will slow down the rate of temperature change of the plate contents to approximately 1°C per minute, and so can keep the plate temperature below 10°C for 5 minutes after you have cooled it on the plate thermal module to 4°C.
9.5.3.ii Reservoirs
You will need these elements to heat or cool reagents in reservoirs.
A ‘Start and wait’ or ‘Start and continue’ step to start the reservoir thermal module heating or chilling. Make this one of the first steps of the protocol if you want to load reagents and maintain their correct temperature, , or set the reservoir thermal plate temperature using the Decks screen. Use a 'Stop' step to end heating or cooling if it is no longer needed.9.5.4 Incubate, using the thermal cycler
You will need these elements to use the ODTC. Before you incorporate an 'Incubate' step in your firefly protocol, you must have created the pre method and main method XML files in the ScriptEditor 3 software.
You can use lidded or unlidded plates on the ODTC. You can run an incubation step with the ODTC lid open or closed.
NOTE: The height of the plate or plate + lid stack must not exceed the ODTC clearance:
-
28.0mm for 384 plates
-
32.0mm for 96 plates
- Use an 'Incubate' step with Open lid behavior.
- Use a 'Move' step to transfer the plate to the thermal cycler.
- Use an 'Incubate' step with Close lid behavior, optionally.
- Use an 'Incubate' step to run the pre- method, or, alternatively use the 'Run both' Method
Type to run the whole protocol. The purpose of the pre- method is to heat or cool the ODTC
to the required temperature, so you may wish to run this using 'execute and wait' behavior,
before loading the plate. - Use a second 'Incubate' step to run the main method. You can run multiple main methods
sequentially, but to do this you must set the Post Heating property to true for all but the last
method.

6. Use an 'Incubate' step with Open lid behavior, if you had closed the lid previously.
7. Use another 'Move' step to remove the plate
If you are going to remove a lid from a plate after PCR, you may want to transfer it to a waste plate, to keep the firefly+ shelves clean.
IMPORTANT: Do not leave a plate in the thermal cycler for hours after completing a PCR step, as this causes condensation to build up in the thermal cycler. SPT Labtech recommends moving the PCR plate to firefly's thermal module, if you want to keep it cool until you are ready to remove it from the instrument.
Using hold temperature
You can utilise the ODTC's indefinite temperature hold function within a firefly protocol to keep a plate at a fixed temperature. This may be useful if you want to incubate successive plates at the same temperature, as loading and unloading plates does not stop an indefinite hold.
However, if you use this, when the firefly protocol completes, the ODTC will continue to run and hold the temperature, even after the plate has been removed from the ODTC.
So that it is not forgotten about, design the firefly protocol so that:
- If you are using the temperature hold in the middle of the firefly protocol, include a subsequent Incubate step with Behaviour set to Stop. This will cancel the indefinite hold.
- If you are using an indefinite hold at the end of the firefly protocol so that you can leave firefly running and come back for the plate at a convenient time, design your protocol with a User Interaction step to retrieve the plate. After that, include another Incubate step with Behaviour set to Stop as the last step. This way it will be clear that firefly and the ODTC are still running, and that the plate has been kept at a controlled temperature but needs to be unloaded.
9.5.5 Designing User interactions
When you design a user interaction, you are giving the firefly user instructions which will be displayed as a message on the screen so they must be clear and in the correct order.
You may want to include user interactions for unloading reagents and consumables used in your protocol, or you may want to complete the protocol and then use your lab procedures for emptying and cleaning firefly
- Use the correct Rest state (see section 9.4.20) to enable the user to access specific areas safely.
- Use the unloading instructions (see section 6.6) as a prompt for your user interactions and SOPs.
- Write a series of short user interaction steps rather than one detailed complex instruction, if the user has multiple tasks to carry out. That way they can confirm when they have finished each one.
- If the user is going to need labware or reagents which are not loaded in firefly, create a User interaction early in the protocol to confirm that those items are available and ready for use. This is particularly important if there are time critical steps in the protocol which must not be delayed.
- Think ahead: if the plate will need to be transferred to another instrument, does it need time to set up or to reach a temperature setpoint? If so, you should have a User interaction to get that instrument ready at an earlier stage in the protocol, so the user is preparing it while firefly is performing other steps.
- You could give the user conditional instructions, e.g., the first user interaction is to perform an assay and the second is to use the results to determine how much diluent to add to a sample.
- If there is anything particularly complex, the User interaction could direct the user to another method document in the lab, to display charts, diagrams or more detailed instructions than can be shown on firefly’s tablet screen.
9.5.6 Stacking Assets
You use the pipetting head grippers to stack plates on top of other assets, using 'Move' or ‘Place on’ to create a stack, and 'Move' or ‘Take off’ to separate the items. Some items, like the plate thermal module, can only be base items.
NOTE: To use the ODTC, you must have a stack definition for the ODTC with each of the PCR plate types you wish to use. Use Community to download stack definitions. If you cannot find what you need, contact reliance.
To move stacked assets together, drag and drop the bottom item from Assets to Steps, when designing. The graphic will show that the two assets are moved together.
 Using stacks, you can keep a plate on a magnetic block or thermal block while pipetting or dispensing.
You can only use combinations of lids and plates or plates and base items which have a stack
definition. Use Community to download stack definitions. If you cannot find what you need,
contact reliance.
9.5.7 Setting up the Decks
Once you have finalized the labware your protocol will require, open the Deck screen to set up loading firefly.
You can set the initial temperature of the reservoir or plate thermal blocks.

Use the Auto Deck Fill (highlighted above) to automatically select the layout for your assets.
IMPORTANT: If you use Auto Deck Fill when you have an undefined stack in your protocol, collision detection would work based on the wrong stack definition so shouldn’t be trusted until this error is removed.
Download the stack definition before using Auto Deck Fill.
You can drag and drop your assets onto deck locations. If you do this, check the Errors panel on
the Steps view afterwards, in case you need to revise your layout. There is a Reset Decks function which empties the entire deck, to start again if you need to. To remove a single asset, right click on it and select 'Remove'. You can then drag it to a new location.
If you are not using Auto Deck fill, the allowed positions for labware loading are shown below.
9.5.8 Using firefly+
The Auto Deck Fill function will use the shelves in firefly+ to place suitable labware. There are
height restrictions (shown in mm below) for the labware which you can place on each shelf type.
 The overall allowed storage positions are:If the shelves are in use, the firefly+ grippers need a clear deck location to place labware, before it is used in a protocol. This can be U2, U3, L2 or L3. You may need to modify your deck layout manually to clear one of these deck locations if you see error messages when you attempt to run your protocol.
Ideally try and keep all 4 of these locations (or as many as are practical for your materials) empty, when setting up the decks for your protocol, as it will make protocol execution more efficient.
9.5.9 Getting feedback from the Errors panel
Check the Errors panel as you are designing your protocol: it will notify you of volumetric inconsistencies or missing steps such as using tips without a prior Load Tips step. There are 3 levels of severity:
- Errors are the most serious problems i.e., when you have not defined a step correctly. If there are Errors, your protocol cannot be executed.
- Warnings will not prevent firefly executing your protocol, but they alert you to significant problems i.e., when cross contamination may occur.
- Information messages alert you to minor issues or possible improvements.

Everywhere you see ‘{xxx}’ there will be the name of an asset, a plate, a well volume or other
specific item in the actual error messages.
![]() Clicking on the associated step number will highlight the step in the step area.
Clicking on the associated step number will highlight the step in the step area.
Resolve all errors to enable the protocol to run.
Errors
| The (item) is not present on the targeted instrument [shown if protocol requires modules which are not present on the instrument] |
| The protocol makes use of hardware that is not present on your instrument. Affected steps will need to be updated and/or replaced in order to run the protocol. |
| The protocol makes use of deck location {xxx} that is not present on your instrument. Remove references to invalid deck locations to run the protocol. |
| Dynamic labware {dynamicitem.labware.Id} could not be placed. Ensure there is space on the relevant deck. |
| Protocol contains labware that has been allocated an initial deck location not present on the targeted instrument |
Well arrays
| {wellArrayType} well array not set. |
|
Destination well array not set. |
| Well selection mismatch. Source and Destination well arrays should be equal in size. |
| Invalid volume at well {xxx}. Specified volume must be at least zero. |
| Invalid volume at well {xxx}. Specified volume must be less than {xxx}μL maximum well volume. |
| The starting volume of {wellArray.Id} is invalid. Specified volume must be at least 0µL. |
| Source and Destination well arrays contain overlapping wells. Source and destination well arrays cannot share the same wells. |
Tips & Pipetting
| Incompatible pitch between loaded tips and {xxx} well array. Change {xxx} well array. |
| Insufficient tips loaded in head. Check that the loaded tip box contains enough tips to perform {xxx}. |
| Tips have not been loaded into head. Make sure tips are loaded before performing {xxx}. |
| Cannot perform tip unload. The head does not contain tips. |
| Cannot perform tip load. {xxx} must be unloaded first. |
| Cannot perform tip unload. The head contains {xxx} not {xxx}. |
| Insufficient volume in tips. Reduce {xxx} volume. |
| When Pipetting to the lower deck, the plate should be on a lower deck riser to give the greatest flexibility. |
| Pipetting head can not hold more than a single row of tips. Rearrange well region into columns, or reduce well region to a single row. |
| Insufficient transfer volume. Specified volume must be greater than {minimum Allowed Volume}μL. |
| {xxx} volume exceeds tip capacity of {xxx}µL. Change tip type or reduce {xxx} volume. Adjusting Blowout, Transport and Overshoot volumes can also reduce required tip capacity. |
| Insufficient safeguard volume. Specified volume must be at least 0µL. |
| The {step xxx} {speed} is out of range and would cause protocol execution to fail. |
| Invalid number of mix cycles. Specified value must be greater than 0. |
| {xxx} volume exceeds tip capacity of {xxx}µL. Change tip type or reduce {xxx} volume. Adjusting Blowout, Transport and Overshoot volumes can also reduce required tip capacity. |
| Insufficient safeguard volume. Specified volume must be at least 0µL. |
| The {speed.StepRef} {speed.SpeedName} is out of range and would cause protocol execution to fail |
| Invalid number of mix cycles. Specified value must be greater than 0. |
| Tips contain {liquidVolume}μL of liquid and {airVolume}μL of air aspirated by step {xxx}. Empty tips before unloading. |
| Tips contain {liquidVolume}μL of liquid and {airVolume}μL of air aspirated by steps {xxx}. Empty tips before unloading. |
| Tips contain {liquidVolume}μL of liquid aspirated by step {xxx}. Empty tips before unloading. |
| Tips contain {liquidVolume}μL of liquid aspirated by steps {xxx}. Empty tips before unloading. |
| Tips contain {airVolume}μL of air aspirated by step {xxx}. Empty tips before unloading. |
| Tips contain {airVolume}μL of air aspirated by steps {xxx}. Empty tips before unloading. |
| The tip head will contain tips at the end of execution. Add a Tip Change step to the end of the protocol to unload. |
| Tip Box '{xxx}' must be on the lower deck when loading. |
| Tip Box '{xxx}' must be on the lower deck when unloading. |
| {TipType} cannot be loaded from a 96-well tip box. |
| {TipType} cannot be discarded to a 384-well tip box. |
Syringes & dispensing
| {xxx} and {xxx} share {syringes}. Reservoirs cannot be shared across assets. |
| Source reservoir not set. |
| No reservoirs selected in source reservoir. |
| Maximum reservoir capacity has been exceeded in {syringeArray}. Change reservoir type or reduce the dispense volume |
| Maximum reservoir capacity has been exceeded in {syringeArray}. Increase the number of reservoirs, change the reservoir type or reduce the dispense volume |
| Maximum Syringe volume of {Volume}µL exceeded in {source}. Reduce {step} volume, change the reservoir type, or increase the number of syringes used. |
| Maximum Syringe volume of {Volume}µL exceeded in {source}. Reduce {step} volume or change the reservoir type. |
| Maximum reservoir capacity exceeded. Reduce {step} volume. |
| Maximum reservoir capacity exceeded. Reduce {step} volume or change the reservoir type. |
| Maximum Syringe volume of {xxx}µL exceeded in {source}. Reduce {step xxx} volume or increase the number of syringes used. |
| Insufficient volume in {syringesUsed} to perform this dispense. Ensure a dispense head aspirate step has been performed to all the Syringes used. |
| Maximum Syringe volume of {xxx}µL exceeded in {source}. Reduce {xxx} volume. |
| Maximum volume {xxx}µL exceeded in {syringeArray xxx}. Reduce {xxx} volume. |
| Transfer volume exceeds the maximum allowed. Specified volume must be <= {maxVolume} µL which is the maximum syringe volume. |
| Transfer volume + safeguard volume exceeds the maximum allowed. Specified volume must be <= {maxVolume}µL which is the maximum syringe volume |
| The liquid dispense will also contain safeguard liquid. Check liquid and safeguard volumes. |
| The {zeroSpeed.StepRef} {zeroSpeed.SpeedName} is set to zero and would cause protocol execution to fail. |
|
Destination has not been specified.
|
| Number of columns in Destination: {xxx}, does not match the number of columns in Data File: {xxx}. |
| Number of rows in Destination: {xxx}, does not match the number of rows in Data File: {xxx}. |
| Destination Plate Id: {xxx}, does not match the Plate Id in Data File: {xxx}. |
| CSV file not specified. Enter the file path in the Data File property. |
| CSV file does not exist. Check the file path in the Data File property. |
| All volumes in Data File are zero. |
| No Dispense Pattern found. Please check that volume is not Zero. |
| Insufficient transfer volume in Data File for one or more selected wells. Specified volume must be at least Single Shot Min Volume ({xxx}µL) |
| A multi-column transfer between a {source} and a {destination} is not supported. |
| No volume to dispense. Ensure at least one well has a non-zero dispense volume specified or remove step if not needed. |
| Volume is below the Single Shot Min Volume ({xxx}µL). |
| Single Shot Min Volume must be at least equal to Multi Shot Min Volume. |
| Multi Shot Min Volume must be less than or equal to half of Max Shot Volume. |
| Syringes contain liquid from a previous aspiration. Dispense all liquid before re-aspirating. |
| Required syringes are not present on the targeted instrument |
| Can't execute step: No empty locations found to move Plate {destinationPlate.Id} for Dispense", suggestion:"At least one deck location needs to be empty to allow auto moves for Dispense Head steps" |
Pause
| Pause duration must be greater than 0. |
Thermal modules
| Thermal module not set. |
| Stop behaviour used before Start and Continue. |
| {xxx} Temperature must be >= -20°C. |
| {xxx} Temperature must be <= 99°C”. |
Shaker
| Shaker missing plate. |
| Shake speed must be 200 or more. |
| Shake speed must be 3000 or less. |
| Shake duration must be greater than 0. |
| Trough plates cannot be shaken. |
ODTC
| An Incubate Pre method has already been run. |
| An Incubate Pre method was run on a different plate. |
| An Incubate Pre method must be run before a Main method. |
| {xxx} well Plates cannot be placed on the thermocycler. |
| Cannot place {Lid} on top of {Plate 1} whilst {Plate 1} is on the Thermocycler.", suggestion: "Remove {Plate 1} from the Thermocycler before placing labware on top of it. |
Stacks
| Top and Base Items not on same stack. |
| Base item is empty. Add a stackable item (e.g., Magnetic Block, Thermal Plate). |
| Top item is empty. Add a top item (e.g., Plate). |
| {xxx} already has an item on top of it. |
|
{xxx} plate '{xxx}' covered by lid '{xxx}'. Remove lid from plate before performing {xxx}.
|
Collision Detection
| Moving {srcLabware} from {srcLoc} will collide with {dstLabware} at {dstLoc}. |
| The Dispense head back frame will collide with labware in deck location {collisionLoc.Location}", suggestion: $"Move labware from {collisionLoc.Location}. |
| If {prevCollidingSyringes} not attached, the Dispense head back frame will collide with labware in deck location {collisionLoc.Location}", suggestion: $"Move labware from {collisionLoc.Location}. |
| The Dispense head back frame will collide with labware in deck location {collisionLoc.Location}", suggestion: $"Move labware from {collisionLoc.Location}. |
| If {prevCollidingSyringes} not attached, the Dispense head front frame will collide with labware in deck location {collisionLoc.Location}", suggestion: $"Move labware from {collisionLoc.Location}. |
| The Dispense head front frame will collide with labware in deck location {collisionLoc.Location}", suggestion: $"Move labware from {collisionLoc.Location}. |
| If {prevCollidingSyringes} not attached, the Dispense head left frame will collide with labware in deck location {collisionLoc.Location}", suggestion: $"Move labware from {collisionLoc.Location}. |
| The Dispense head left frame will collide with labware in deck location {collisionLoc.Location}", suggestion: $"Move labware from {collisionLoc.Location}. |
| If {prevCollidingSyringes} not attached, the Dispense head back frame will collide with labware in deck location {collisionLoc.Location}", suggestion: $"Move labware from {collisionLoc.Location}. |
| The Dispense head back frame will collide with labware in deck location {collisionLoc.Location}", suggestion: $"Move labware from {collisionLoc.Location}. |
| If {prevCollidingSyringes} not attached, the Dispense head front frame will collide with labware in deck location {collisionLoc.Location}", suggestion: $"Move labware from {collisionLoc.Location}. |
| The Dispense head front frame will collide with labware in deck location {collisionLoc.Location}", suggestion: $"Move labware from {collisionLoc.Location}. |
| Tips loaded in head will collide with {wellArrayType} plate. Match loaded tips with number of wells on plate. |
| "Pipetting Head would collide with labware in deck location {xxx}", suggestion: $"Use a riser or move labware to the first Column". |
| Pipetting Head would collide with labware in deck location {xxx} (collision margin: {clearance} > 0)", suggestion: $"Use a riser or move labware from {xxx}". |
| Cannot load tips: The Pipette Head will collide with labware at {adjacentLeft} with height {xxx}mm whilst attempting tip load from tip box at {tipBoxLocation} at height of {xxx} mm |
| Cannot load tips: The Pipette Head will collide with labware at {adjacentLeft} with height {xxx}mm whilst attempting tip load from tip box at {tipBoxLocation} at height of {xxx} mm |
| Cannot discard tips: The Pipette Head Cover will collide with labware at {xxx} (with height {xxx}mm) whilst attempting tip load from tip box at {tipBoxLocation} at height of {xxx}mm |
| Cannot discard tips: The Pipette Head Cover will collide with labware at {xxx} (with height {xxx}mm) whilst attempting tip load from tip box at {tipBoxLocation} at height of {xxx}mm |
| Cannot load tips: The Head Gripper will collide with labware at {adjacentLeft} with height {xxx}mm whilst attempting tip load from tip box at {tipBoxLocation} at height of {xxx} mm |
| Cannot discard tips: The Head Gripper will collide with labware at {xxx} (with height {xxx}mm) whilst attempting tip load from tip box at {tipBoxLocation} at height of {xxx}mm |
Height Restrictions
| Current step changed Deck setup. {Labware stack/Labware} height at Deck location {xxx} now exceeds the maximum {xxx}mm for lower deck. |
| Current step changed Deck setup. {Labware stack/Labware} height at Deck location {xxx} now exceeds the maximum {xxx}mm for upper deck. |
| {Labware stack/Labware} height at Deck location {xxx} exceeds the maximum {xxx}mm for lower deck |
| {Labware stack/Labware} height at Deck location {xxx} exceeds the maximum {xxx}mm for upper deck |
| {Labware stack/Labware} height at Deck location {xxx} exceeds the maximum {xxx}mm for upper deck. Suggestion: {Labware stack/Labware} cannot be used on firefly instrument. |
| The Syringe Z-Offset of {xxx}mm is greater than the maximum allowed of {xxx}mm due to hardware limits. Decrease the Z-Offset |
firefly+
| Cannot take '{topItem}' off '{lowerItem} in location {xxx} directly |
| Cannot place '{topItem}' on top of '{topItemInDestination} in location {xxx} directly from {xxx} |
| {topItem}' is incompatible with location {xxx} |
Error or warning depending on asset
| Insufficient transfer volume in Data File for one or more selected wells. Specified volume must be at least {minimumAllowedVolume}µL. |
Warnings
| The Syringes ({xxx}) - IF ATTACHED) will collide with labware in deck location {xxx}. Switch to top Row Syringes or move labware from {xxx}. |
| The Syringes ({xxx}) - IF ATTACHED) will collide with labware in deck location {xxx}. Switch to bottom Row Syringes or move labware from {xxx}. |
| The Syringes ({xxx}) - IF ATTACHED) will collide with labware in deck location {xxx}. Switch to left Column Syringes or move labware from {xxx}. |
| The Syringes ({xxx}) - IF ATTACHED) will collide with labware in deck location {xxx}. Switch to top-left Row Syringes or move labware from {xxx}. |
| The Syringes ({xxx}) - IF ATTACHED) will collide with labware in deck location {xxx}. Switch to bottom-left Row Syringes or move labware from {xxx}. |
| Please ensure syringes are removed before running protocol to avoid collision with the {xxx} at Deck location {xxx} |
| Insufficient volume in {syringeArray xxx}. Reduce {xxx} volume. |
| Insufficient transfer volume. Specified volume must be at least {minimumAllowedVolume}μL. |
| Volumes used in this step exceed the maximum Source well volume of of {xxx}µL. Reduce {step xxx} volume or change Source plate. |
| Volumes used in this step exceed the maximum Destination well volume of {xxx}µL. Reduce {step xxx} volume or change Destination plate. |
| The starting volume of {xxx} is greater than the maximum well volume of {well Array Maximum Allowed Volume}µL". |
|
Cannot Perform Left Or Right Tip Touch for Plate {xxx}.
|
| Excessive tips used with source well array to perform {xxx}. Consider alternate tiling pattern. |
| Excessive tips used with source well array to perform {xxx}. Contamination may occur. |
| Excessive tips used with {wellArrayType} well array to perform {xxx}. Contamination may occur. Tips and Well Array’s dimensions should ideally match. |
| Start Well Height set to >100% and would be clipped at 100% to allow dispense at well bottom |
| Start Well Height set to >110% and would be clipped to 110% to avoid a crash. If Aspirate plate stack is not sprung please set to <=100% to avoid a crash |
| End Well Height set to >100% and would be clipped at 100% to allow dispense at well bottom |
| End Well Height set to >110% and would be clipped to 110% to avoid a crash. If Aspirate plate stack is not sprung please set to <=100% to avoid a crash |
| Insufficient mix volume. Specified volume must be greater than {minimumAllowedVolume}μL. |
| Insufficient post mix aspirate volume. Specified volume (or blowout) must be at least {minimumAllowedVolume}µL |
| Insufficient post mix dispense volume. Specified volume (or air-gaps) must be at least {minimumAllowedVolume}µL. |
| The dispense blowout volume will also contain liquid. Check liquid volumes and air-gaps. |
| The liquid dispense will also contain air. Check liquid volumes and air-gaps. |
| The dispense air transport volume will also contain liquid. Check liquid volumes and air-gaps. |
| Recommended reservoir capacity has been exceeded in {syringeArray}. Change reservoir type or reduce the dispense volume. |
| Recommended reservoir capacity has been exceeded in {syringeArray}. Increase the number of reservoirs, change the reservoir type or reduce the dispense volume. |
| Recommended reservoir capacity of {Volume}µL exceeded. Reduce {step} volume. |
| Recommended reservoir capacity of {Volume}µL exceeded. Reduce {step} volume or change the reservoir type. |
| {syringes} will contain up to {maxLiquidVolume}µL of liquid plus {maxSafeguardVolume}µL safeguard volume after the step is complete. Check liquid and safeguard volumes are correct and perform manual purge after execution. |
|
{syringes} contain up to {maxLiquidVolume}µL of liquid volume. Check liquid volumes are correct or add dispense step to purge.
|
|
{syringes} contain up to {maxLiquidVolume}µL of safeguard volume. Perform manual purge after execution.
|
|
User Interaction does not contain a message. Enter a message to direct/instruct the user.
|
|
Plate {xxx} has no Volumetric data so will ignore AutoTracking and pipette from bottom of the well.
|
|
The {labwareType} '{labwareName}' has not been approved. Using an unapproved {labwareType} may cause your instrument to crash.
|
|
The protocol is using an out-of-date definition of {labwareType} '{labwareName}'. Consider updating the Protocol to use the latest version of the {labwareType} from the local DB.
|
|
The protocol is using an unapproved stack '{stackName}'. Using an unapproved stack may cause your instrument to crash.
|
|
Insufficient liquid volume in {source} to perform {xxx}. Reduce {xxx} volume or increase liquid volume in {source}.
|
|
Insufficient liquid volume in Source wells to perform {xxx}. Reduce {xxx} volume or increase liquid volume in Source wells by selecting the well array asset in the assets list and modifying the “Starting Volume per well (µL)” property.
|
|
Unnecessary purge. Syringes do not contain any liquid.
|
|
Unnecessary purge. Tips do not contain any liquid or air-gaps.
|
|
On completion of this {xxx} step the volume remaining in the Source wells will be below the dead volume of {xxx}µL. Reduce the {xxx} volume or increase liquid volume in Source wells by selecting the well array asset in the assets list and modifying the “Starting Volume per well (µL)” property.
|
|
On completion of this {step} step the volume remaining in {syringeArray} will be below the dead volume of {Volume}µL. Reduce {Title} volume.
|
|
An Incubate Pre method has no corresponding Main method.
|
Warning or Information
| Moving {labware} from {location} to {destination location}. |
Information
| Start Well Height set to >100%. Please ignore if this is a sprung aspirate. If Aspirate plate stack is not sprung please set to <=100% to avoid a crash. |
| End Well Height set to >100%. Please ignore if this is a sprung aspirate. If Aspirate plate stack is not sprung please set to <=100% to avoid a crash. |
| Tips have been used in a previous step. Possible contamination risk. |
| Tips contain liquid from previous step. Possible contamination risk. |
| {xxx Thermal Block} missing thermal block. |
| {xxx Thermal Block} missing Plate. |
| {volumePerTip}µL per tip will be transferred from the Trough plate. |
| {volumePerTip}µL per tip will be transferred to the Trough plate. |
| Failed to check reservoir volumes. Check Instrument connection. |
| Failed to check reservoir volumes. Check Machine Logs. |
| Reservoir volume cannot be checked due to errors in DFD related steps. Correct the reported errors. |
| The {labwareType} '{labwareName}' is not installed in the local DB and can only be used with the current protocol. |
| The plate {plateName} in this protocol is not installed in the system DB and is only available for use within the current protocol. Add to system DB. |
| The protocol is using a different stack definition for {stackName} than is saved in the system DB. Update protocol. |
| The protocol is using a more recent definition of {labwareType} '{labwareName}'. Consider updating the local DB to the version of the {labwareType} used with the Protocol. |
| The protocol is using a more recent version of {xxx}. Update system DB. |
| Undefined Stack Definition for '{topItem}' on '{baseItem}'. Collisions my occur and/or aspirate and dispense actions may be performed at incorrect heights. |
| The system DB contains a different, but unapproved, stack definition for {stackName}. |
| The system DB contains a more recent version of {xxx}. Update protocol. |
9.5.10 Collision detection
As you design your protocol, firefly will warn you about collisions, where labware will obstruct the movement of the pipetting head e.g., if you are loading tips from a tip box when there is a plate on the thermal module.
The error message will suggest modifications to solve the collision issue, but you may not want to implement them. If you use Auto Fill Decks while you have an unsolved collision error, you will be warned that you need to place your labware manually.
 As you cannot execute a protocol which has errors, you can try and solve the collision problem by:
- manually dragging and repositioning the labware which will collide, particularly if you have
empty positions available on the decks - revise the order of protocol steps other than the suggested modification if you have scope to
do this - use the deck appropriate riser to lift the lowest plate and so raise the working height of the head, avoiding collisions
Keep checking the Errors panel as you make changes, to see whether you have resolved the error.