.png?width=300&height=157&name=spt%20logo%20png%20(1).png)
The Status Panel will update with information as you move through the workflow. If a section is not displaying a reading, then the appropriate point in the workflow has not yet been reached. If the text in a section is red, the reading is out of range.

The cryogen bowl reports both the level of the liquid nitrogen (in 5% increments) and the ethane temperature. 55% LN2 corresponds to just above the grid storage button. The chameleon system will not allow the user to plunge a grid if the LN2 level is at or below 55%.
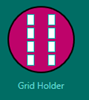
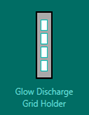
There are three tracked grid locations within the chameleon system: the Grid Holder, the Glow Discharge Grid Holder and the Output Button. All three are graphically displayed in the Status Panel and updated as grids move through the system.
|
|
Grid loading sequence |
|
|
The slot numbers on the Grid Holder increase from the front left to back left, then front right to back right. Eight grids total can be loaded into the chameleon at once. |
|
|
The slot numbers in the Glow Discharge Grid Holder also increase from front to back. Grids will always be placed into the lowest numbered empty slot first. |
|
|
The Output Button follows the FEI convention of loading grids as the slots are labelled on the buttons themselves. In the orientation of the image at left, slot 1 is the bottom left, slot 2 is top left, slot 3 is bottom right, and slot 4 is top right. |

The time since aspiration and remaining volume of sample in the dispenser are tracked throughout the session. The time since aspiration will turn red at 30 minutes. The remaining volume will continuously decrease throughout the session, not only due to the process of freezing grids, but due to maintenance dispenses which increase dispenser robustness.
The humidity in the shroud is automatically set to 80% with a ±5% window.
The Sample Block Temperature is user controlled (between 4°C and 37°C).
The status of the doors is displayed here alongside visual indicators through color changing lights in the chameleon system.
Note: The order in which the screens are presented depends on the state of the system at any given time and therefore may not follow the order described here. At branch points in the workflow, as best as possible, each option is described before the workflow is re-joined.