.png?width=300&height=157&name=spt%20logo%20png%20(1).png)
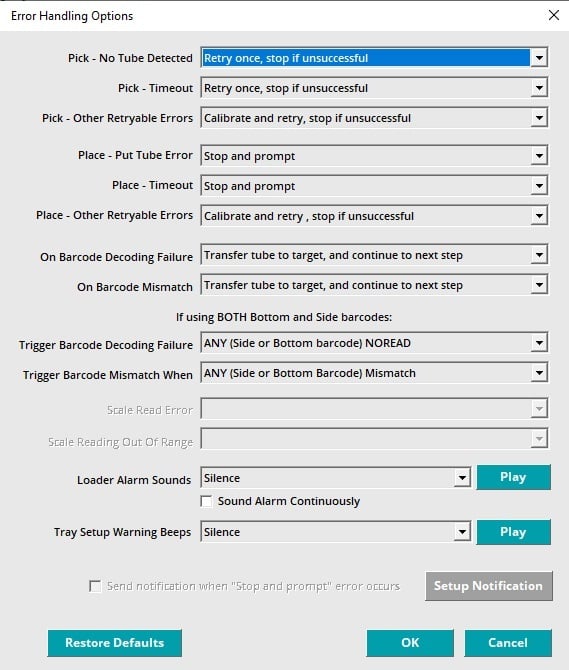
The Work List Error Handling Options allow you to select the error handling routines for many of
the more common XL20B error conditions.
Example errors and error clearing actions:
- Missed pick of stuck tube
- Loosen tube and click on Retry button
- Missed pick, no tube found
- Check why no tube was found, replace tube if needed, then click retry button
Pause and restart

The bottom left section of the Worklist Processor screen has three navigation buttons:
- Start – After rack set up, press the Start button to begin work list processing.
- Stop – When you stop processing a job, you have ended the operation and will need to
import the work list again to restart processing. - Pause – Start and stop the instrument during processing.
If you are re-starting a partially completed job, you can skip the worklist actions which are already complete. From the Main Processing screen, select the row on the work list processing screen where you wish to re-start, and right click to open the content menu:
- Execute starting from this row - use this to finish a worklist which has been interrupted
- Execute this row only - allows re-run of the portion of a worklist that wasn’t carried out correctly (maybe the wrong tube was placed, or a barcode got smeared) and the output from the selected row will be merged to the existing output file with the matching RackID/Position. The setting to allow such merging can be found in 'Settings/Output Settings/Worklist Based Processing Output' menu, when the button “Allow MERGE of new data to existing data…” is selected. The same applies to the “Execute starting from…” option.
- Undo all steps - moves all tubes back to their source rack positions
- Undo last step only - as above, but note that the undo functions cannot operate in random
processing mode, where racks may be moved at any point.
Selecting Tare / Gross Weighing Mode
.jpg?width=622&height=385&name=gross%20weighing%20procedure%20(1).jpg)
- Click on Settings Menu.
- Click on Job Options to display the selection screen (above).
- Select Tare/Gross Weighing mode.
-
The XL20B software will automatically close when changing between Work list based processing mode and Tare/Gross weighing mode.
- Re-start software by clicking on XL20B icon on the Windows desktop.
.png?width=688&height=489&name=Tare%20Gross%20Weighing%20Mode%20Main%20Screen%20(1).png)
After re-starting the XL20B software will now display the selected mode in upper left corner of the screen.
You are now ready to weigh tubes.
Tare / Gross Weighing Mode Output Options

This screen allows selection of the parameters for the Tare and Gross weighing modes.
- Use the Output Folder selection to assign the directory where the output file is saved. The output file is saved for each completed target rack.
- You can chose the order of data fields e.g. tube position, tube ID, in the output file.
- You can specify header file comments and choose the orientation of your data (row-wise or column-wise).
- The output file is saved for each completed target rack.
- The output file name is: RackID#.TWT for tare weight data.
- The output file name is: RackID#.GWT for gross weight data
Next article - Data collection mode