.png?width=300&height=157&name=spt%20logo%20png%20(1).png)
12.1.1 Routine cleaning
The interior of the instrument will be cleaned by reliance personnel during the scheduled preventative maintenance visits.
If necessary, you can clean the doors, glazing and exterior panels using a clean, damp, lint-free cloth.
12.1.2 Humidifier cleaning
 The humidifier must be cleaned regularly to reduce the risk of pathogens being inhaled by users. The software will remind users when cleaning is required. Failure to clean the system will result in risk of infection.
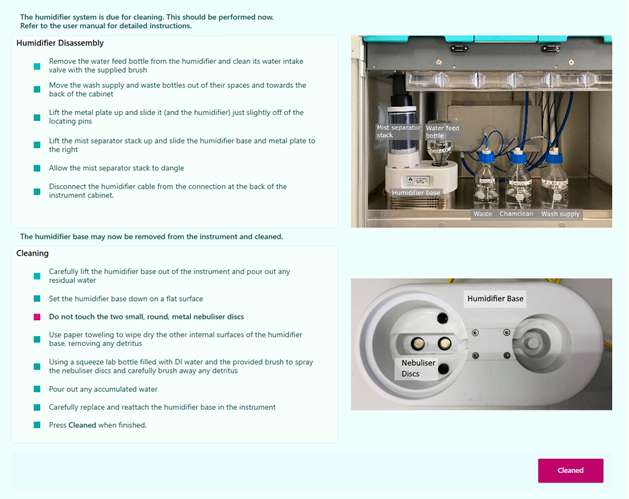
The humidifier should be cleaned on a weekly or bi-weekly interval using the brush provided. The full cleaning procedure is detailed in the software, as shown. Press Cleaned when you have finished cleaning, to access the standard start up checklist.
For stubborn debris a dilute solution of washing up liquid can be used, however, this must be thoroughly rinsed from the humidifier before it is put back into service.
The instrument should be maintained according to the following recommended time intervals:
|
Item |
Action |
Frequency |
|
Humidifier |
Clean humidifier bottle |
Each time the bottle is refilled and as part of regular humidifier cleaning. Follow on-screen instructions |
|
|
Clean humidifier base unit |
As prompted by the software or more regularly if desired. Follow on-screen instructions |
The unit is powered from a flying lead which connects to the socket located at the rear of the lower cabinet.
The humidifier base unit must be removed from the instrument for cleaning. To remove the
humidifier base:
- Power off the control PC and switch off the mains power on the right side of the instrument.
- Move the wash pump supply, ChamClean and used wash fluid bottles out of their spaces and towards the back of the cabinet, as shown below.

- Remove and clean the water feed bottle from the humidifier and clean its water intake valve
with the supplied brush. Be aware of any detritus build up inside the water feed bottle. - Lift the metal plate up and slide it (and the humidifier) just slightly off the locating pins (see
above). - Lift the mist separator stack up and slide the humidifier base and metal plate to the right.

- Allow the mist separator stack to dangle, as shown above.
- Turn the locking ring of the humidifier cable in the anti-clockwise direction to release the
cable.
- Then disconnect the humidifier cable from the connection at the back of the instrument
cabinet.
The humidifier base may now be removed from the instrument and cleaned. To clean the
humidifier base:
- Carefully lift the humidifier base out of the instrument and pour out any residual water.
- Set humidifier base down on a flat surface.
 Do not touch the nebuliser discs (shown above) with your hands.
 - Using paper towelling, wipe dry the other internal surfaces of the humidifier base, removing
any detritus. - Using a squeeze lab bottle filled with DI water* spray the nebuliser discs and lightly brush
away any detritus with the supplied brush.- For a more thorough cleaning, soapy water can be used instead. Prepare soapy water by mixing a household detergent with DI water before applying to the nebuliser discs and other humidifier base surfaces.
- Rinse out soapy water first if used, then pour out any accumulated water.
- Carefully replace and re-attach the humidifier base in the instrument. Plug in the humidifier
cable with the orientation mark (see step 7 above) at the 12 o’clock position. Ensure that the
notch in the humidifier cable plug is aligned to the alignment pin when plugging in the cable. Turn the locking ring clockwise to lock the cable in place.
 - Replace the water feed bottle filled with DI water onto the humidifier base.
- Avoid taking the water feed bottle on and off the humidifier base in a short span of time.
This may lead to flooding of the humidifier base and the humidifier will not be able to
maintain the 80% humidity target. - If the humidifier base is flooded, lift up the mist separator stack and use a syringe to
draw water out of the humidifier base.
- Avoid taking the water feed bottle on and off the humidifier base in a short span of time.
- Replace the wash pump supply, ChamClean and used wash fluid bottles in their spaces.
Using paper toweling, wipe dry the other internal surfaces of the humidifier base, removing any detritus.
- Avoid taking the water feed bottle on and off the humidifier base in a short span of time. This may lead to flooding of the humidifier base and the humidifier will not be able to maintain the 80% humidity target.
- If the humidifier base is flooded, lift up the mist separator stack and use a syringe to draw water out of the humidifier base.
When cleaning take care not to allow water into the electronics zone in the base of the unit. Note that the unit has air vents on either side.

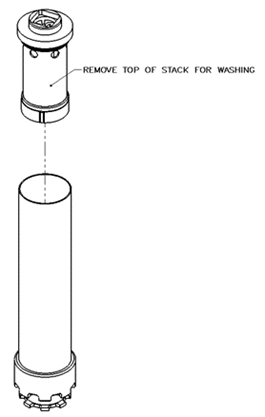
12.1.3 Mist separator stack cleaning
The mist separator stack can be removed for cleaning. If cleaning is required or prompted by chameleon software:
- First remove the humidifier base as usual, leaving the mist separator stack dangling.
- Next, detach the mist separator stack from the top cabinet.
- Finally, the insert at the top of the mist separator stack can be removed from the base of the mist separator stack.
- Both portions can be cleaned using water and the humidifier brush.
12.1.4 Dispenser cleaning after an incomplete workflow
If a problem has occurred and you have closed the chameleon software without going through the cleaning cycle or removing the sample, restart the software as soon as possible and run a clean dispenser workflow, to prevent damage to chameleon.
12.1.5 Clearing up spillages
Soak up any spillages with paper towels, taking care not to touch the dispenser or the tweezer arm. Make sure to wear appropriate PPE in case of methanol spillage and to use an appropriate disposal route.